Sunday, April 1, 2012

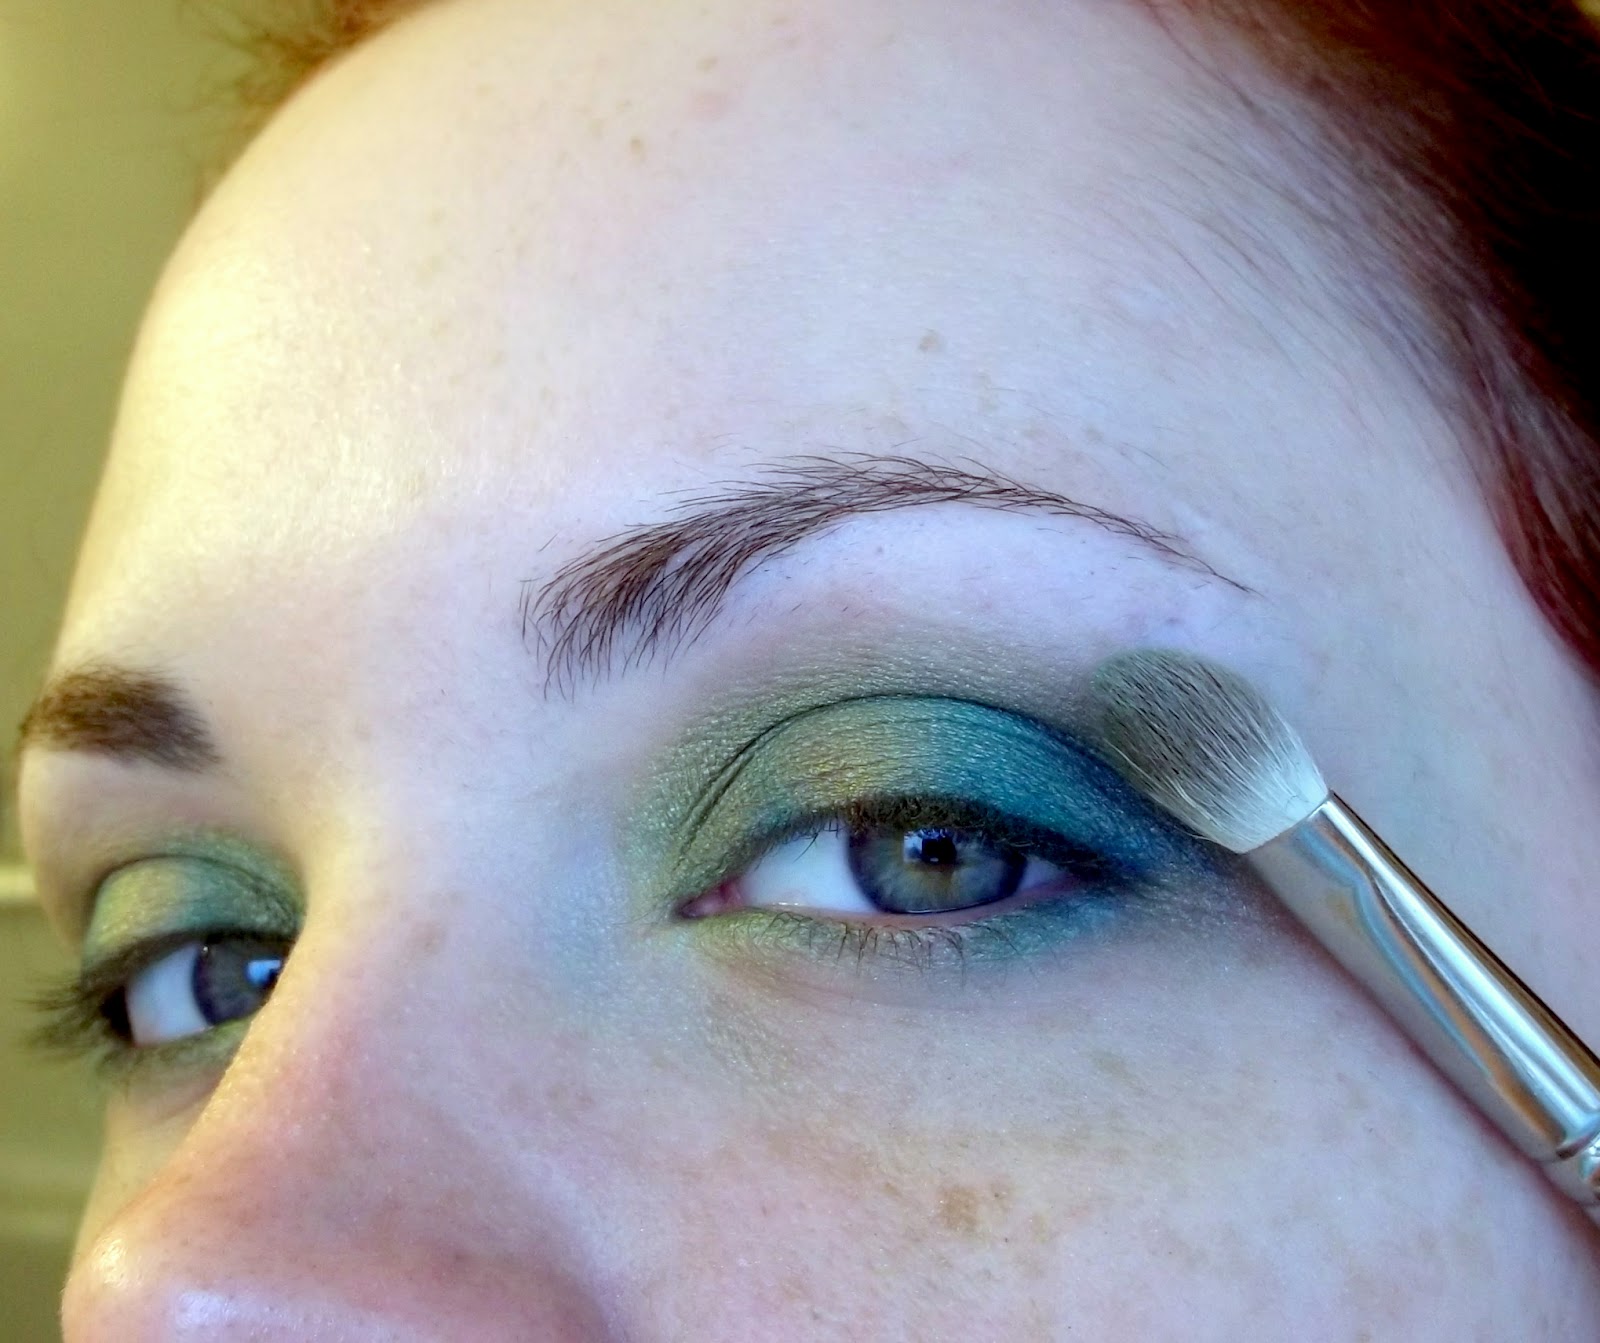
Eye: Peacock

I thought I would do a peacock inspired eye to go with my recent Peacock Nail Tutorial. I haven't done a peacock eye since MAC came out with Peacocky in Winter 2010. The one I did back then was a green and purple, so I thought I'd change it up. This look was a half success. The problem was a combination of things. That I'm feeling lazy, that my brushes were dirty so I couldn't get good colour definition, that I started without a clear idea of what I wanted to do (and overworked my poor sore eye), and also that there were waaay too many colours I wanted to cram in here. I have so many perfect colours!
Anyway, enough buildup! The bottom line is that this is what I did, the colours and brushes I used, and hopefully I inspire someone to try their own.
(Also note my skin in these pictures, in the finished shots. This is the Revlon Photoready Airbrush stuff... Wow! I will review this soon. And finally, excuse my budding unibrow :D)

What I used:

Note that the number has nothing to do with application order... or anything other than to indicate which colour I used)
These are all MAC shadows.
1. Amber Lights
2. Humid
3. Blue Candy (LE)
4. Juxt
5. Freshwater
6. Deep Truth

I have a Lise Watier glitter in the photo that I did not end up using. There is my HG Urban Decay Primer Potion up in the right corner, and from left to right we have MAC False Lashes Extreme Black, Urban Decay 24/7 Pencils in Electric & Baked, MAC pencil in Undercurrent, and Stila Stay All Day Waterproof Liquid Liner.
The 219 that is hiding is a pencil brush. From top to bottom, you'll see me refer to these as  my flat brush, shading brush, blending brush, angled brush, pencil brush, and fluffy brush. 


 I applied Juxt lightly all over my eyelid up to my brow with my big fluffy brush, then I patted it on my lid with my shading brush.


I always wiped my brushes after switching colours, but you should probably use different brushes if possible. I was just being lazy. Here I'm applying Amber Lights to the center of my eyelid in a patting motion using my shading brush.


I used my shading brush and Blue Candy (LE) to apply slightly rounded line of colour. You want this colour to "hug" your eyeball. (sounds gross, right?) 


Then you're going to do the same to the other side of your eyeball, curving outward. Like so... 
After that, you'll be building your colour towards the outer corner of your eye. I applied some Lucky green right beside the Blue Candy, and then some Freshwater. It started to look a bit muddy... too many colours on one dirty brush, but I go back in to define the colours in a minute.

I dipped my pencil brush into Amber Lights and patted over the original section. Then I did the same with Lucky Green, Blue Candy, Freshwater... I went from lightest to darkest just so I wasn't buggering up the brush. I could have avoided this all with better planning, but this is how it all went down! Haha. 


I grabbed my blending brush and very lightly worked from the inside corner to the outside with little outward sweeps. You want to blend it, but not too much. The colour individual should definitely stand out. 

From here I cleaned up the fallout with a Q-Tip and some moisturizer. I took my pencil Brush and applied Deep Truth to the outer 1/3rd of my crease and blended it in a windshield wiper motion with my blending brush, then took my fluffy brush and lightly swept some Juxt overlapping my crease colour and a bit up towards the brow. I blended that very well with little circular motions. I applied my eyeliner, and I used Humid to blend outer corners of my eyeliner up into the Deep Truth applied to my crease. 

A few of my pictures didn't turn out, which is why I don't have pictures of the final few steps, but I used the 3 liners along my lower lash line, just slightly below the waterline (that way when I applied my black liner it wouldn't completely cover them.) I used Baked (the golden colour) in the inner corner, Electric (the bright blue) in the middle, and Undercurrent in the outer corner.I used an angled brush blend the end of one into the start of the next, and flicked the end of Undercurrent up into the winged eyeliner. By now my eyes were so sore from being overworked (it was a trial and error thing) that my eyeliner did not want to stay in place. 

I applied Feline to my waterline, which is a dark black MAC liner. I set it with a fluffy duo fiber brush (MAC 187) and Tarte setting powder. I applied one coat of MAC False Lashes Extreme Black mascara. Somewhere in between I penciled on my brows and applied Revlon Photoready Airbrush makeup with a 187 and a cosmetic sponge. Here is the finished product:


 It's kind of a mess of a tutorial, but it's been a mess of a process! <3
-H. Cat

Saturday, March 31, 2012

Review: 4 MAC Mascaras

I'm working on content. If you have any suggestions feel free to comment. I'll be focusing on reviews and tutorials for the next little while. Also compiling a swatch library. Your feedback is valuable to me <3
The following characteristics will be covered in my future mascara reviews. I will be working out a proper rating system next week.
  • Lengthening
  • Thickening
  • Definition
  • Longevity
  • Formula/Consistency
  • Pigmentation
  • Smudge/Smear/Flake
  • Brush/Packaging
  • Smell
  • Price
  • Repurchase

Haute & Naughty


How it works: This is almost a 2 in 1 mascara. The difference is in the wand and not the formula however. There are two different openings in the tube, but the same wand. One for a more conservative daytime look, and one for a more generous evening application. The smaller opening pulls the excess product off of the brush on its way out. I loved this, because I usually wipe my mascara brush on a tissue to remove the excess anyway. The thicker opening leaves more product on the brush, but I found that it may have been too much and often clumped. I didn’t see as many benefits as I did using the daytime handle of the tube. I used the pink handle almost exclusively because I never had an issue with clumping, and it provided good length, lift, and definition. Because I did tend to use only one side I don’t see much point in repurchasing because it does cost slightly more. The formula is very good, but it is not my favorite of the MAC mascaras. The lengthening and definition of this mascara are what make it great.

Lengthening: The smaller handle provided better lengthening than the thicker. When used with care, either end will provide a good boost in length.

Thickening: More thickness from the sparkly handle, for sure. The issue was to make sure there wasn’t too much product on the wand or it was susceptible to clumping. The pink end did not seem to plump up my lashes (which isn’t so important to me anyway.)

Definition: Outstanding definition from the pink handle. Not so much from the sparkly handle.

Longevity: No complaints. This kept up with me all day, every day after a single morning application. It also didn’t clump the occasional time I refreshed it for evening.

Formula/Consistency: The formula itself is great, provided there is not too much on the brush, in which case (and this is especially true of the sparkly handle) it can clump and even flake while you try to work through the clumps.

Pigmentation: I like a super black mascara. This was just black. Your standard “Blackest Black” but not a “Wow! What IS that!?” black. Ya know?

Smudge/Smear/Flake: This did not smudge smear or flake beyond the initial application process if I had not made sure the sparkly handle did not have too much product on the brush.

Brush/Packaging: The packaging is cute and somewhat clever, opening in two places, intended for daytime and evening, for either a more conservative or striking look

Smell: Typical of MAC mascara, not pleasant but it also didn’t bother me.

Price: There’s a price hike. I did not find it worth it since I only used one end of the
brush. Last time I checked this was retailing for $18 US and $22.50 Canadian.

Repurchase? Probably not. I liked it, but if I were at MAC for a mascara I would be grabbing False Lashes or Plush Lash instead. This would be good for someone with little mascara experience who doesn’t want to put the work into additional coats, or removing excess from their wand. 

Additional note: I actually returned this the first time I bought it. It was winter and every time a snowflake hit my eye, or my eyes watered in the bright sun, this mascara burned like hell. It hurt a lot! One time in particular my son was ill and I had to come pick him up from the daycare. My eyes watered in the wind. I could not get them to stop and I had no choice but to rub them hard. I had smudged awful raccoon eyes from the time I got to the bus stop until we got home and I could wash my face. It was awful. I decided to give it another shot months later and had no such problem at all. 


Zoom Lash

I used this and loved it for years. After a while it just wasn’t doing the trick for me anymore. This is definitely a one coat mascara, as it is thick, thick, thick! It’s a bit of a time saver for that reason. It’s pretty standard. It is a decent mascara, but it doesn’t stand out to me anymore.

Lengthening: You will see decent lengthening from this. Nothing to blow you away, but it should not disappoint.

Thickening: The formula is thick and does a really good job coating the lashes.

Definition: I couldn’t get a ton of definition due to the thickness of the formula. I found if I tried to work for separation I would actually end up with clumps.

Longevity: No problems. Applied in the morning and lasted the day.

Formula/Consistency: Thick. Coats well but does not provide a lot of lift or definition. It’s kind of heavy feeling.

Pigmentation: Not shockingly black, but black nonetheless.

Smudge/Smear/Flake: It’s been a while but I do believe this flaked a bit.

Brush/Packaging: Basic, simple yet chic MAC. The bristles are a bit short... I prefer more dense and fluffy. 

Smell: Typical MAC mascara smell. Not good, but not truly offensive.

Price: It’s slightly overpriced at $15 US, $18 CAD.

Repurchase? Nah. I’m over it. 


Plush Lash

Plush Lash is my second favorite MAC mascara. Actually, it’s my second favorite mascara, period. Just when I needed MAC to step up their mascara game, they introduced this little gem. It’s hard to say what I love about it. It’s just what I wanted! My lashes feel soft and flexible, lightweight, long…The wand is cut into a V shape. It’s simple and yet it makes all the difference. Experiment a bit and you’ll get the hang of working this brush to get maximum benefit.

Lengthening: Excellent length from this one.

Thickening: This adds a good thickness, and because the formula itself isn’t super thick, you can build it up easily.

Definition: Definition is quite good with this one.

Longevity: Morning application lasts all day. I’ve fallen asleep with this on and it still looked good in the morning!

Formula Consistency: This is good stuff. With a little effort you could easily go for the 3rd coat with minimal clumping. That said, you should not need to apply 3 coats anyway. As a tip, it helps to remove the excess from the wand, especially when the mascara is quite new.

Pigmentation: Typical blackest black. I’m always wishing mascaras were blacker, but you should be satisfied with this.

Smudge/Smear/Flake: Zip, nada, zilch. It’s a winner, for sure!

Brush/Packaging: I love MAC’s simple black packaging. The brush of a medium size, bristles lay in a dense V shape. It takes some getting used to, but you’ll know what you’re doing and be able to apply this effortlessly after a few experimental applications. Find whichever edge works best for you, hold the wand close to your roots and wiggle upward.

Smell: It ain’t roses, but it’s not offensive either.

Price:  Slightly pricier than a drugstore mascara, but typical of MAC at $15 US, $18 CAD. Worth every penny in my opinion!

Repurchase? Absolutely! I’ve gone through 2 or 3 of these and I am someone who loves to switch it up.


False Lashes

This is my brand new HG of mascaras. I buy False Lash Extreme Black. I am totally in love with it. It’s everything I’ve sought after in a mascara!
MAC describes this as: “Intensely inky, this lightweight, innovative mousse-like formula saturates lashes in a carbon-black pigment that promises the deepest, darkest, richest look imaginable with full long-lasting coverage. Each stroke of the unique double-lush brush creates vixen volume and lift by filling in sparse lashes, magnifying and multiplying magnificently.” DITTO!


Lengthening: It works! It works so well that I’ve become accustom to having a Q-Tip ready to wipe the transfer when my super long lashes touch my brow bone immediately after applying.

Thickening: Plumps my lashes right up. I generally only use one coat, too.

Definition: Perfect definition!

Longevity: Like all the others, I apply this in the morning and it lasts until I remove it. I’ve reapplied over top in the evening and I have never had an issue with clumping or flaking.

Formula Consistency: Inky, light-weight mousse describes this perfectly. So does amazingsexylovedreamcometrue.

Pigmentation: It’s sooo black! Finally a mascara as black as my soul! Haha I kid, but this is the stuff dreams are made of.

Smudge/Smear/Flake: Not at all!

Brush/Packaging: I think this mascara is super cute. It reminds me of a little potion or a magic wand. The brush itself appears to be your standard medium sized brush, but it’s actually really dense.

Smell: It stinks a bit, but most great mascaras do have that weird rubbery smell.

Price: A little more than the regular ones at $19 US, and $22.50 CAD. I’d sell my soul for a lifetime supply of this.

Repurchase: Yes, yes, yes!! 

Nail: Peacock

Update:

This is what they looked like after sleeping on'em and applying a top coat. They tend to clean themselves up a bit, which is why I don't bother.


This is my pilot attempt at Peacock nails. The colours I have are perrrfect. My technique? Not so much, BUT I learned a thing or two. Besides- Nails are FUN.


I applied a base coat. Mine is from Walmart and it was cheap cheap. 
Wet'n'Wild Base Coat


I applied two coats of my deep green.
Peacock feather hair clip and first of two coats of Sally Hansen Xtreme Wear in "Emerald City"

Because there are so many layers to this look, I thought this was the best solution so that it would actually dry this century. The key, and where I faltered a bit, is to make sure the qtip is saturated in nail polish remover when removing your circular section. That way it will dissolve the polish rather than push it to the edges, creating sort of a well. It's best if you can wait for each layer to dry, but I have 3 children and no time to wait for anything- which is why mine is messy.


I forgot to snap a picture of the 2nd green filled in, but anyway I filled the empty space in the deeper green, and removed an even smaller section of the lighter green. 

Lighter Green is Sally Hansen Xtreme Wear in "Ivy League"

 Fill in with gold, hallow out gold with remover soaked q-tip.
It's repetitive. I'm sure you've had it figured out for a while... I did something a bit different with the lighter blue, but since I did it after the dark blue, wait for it....
Golden colour is Sephora by O.P.I in "Rumba Romance"
This blue is Sally Hansen Xtreme Wear in "Blue Me Away!"


I applied the dark blue (Revlon's "Midnight Affair") in almost a heart shape, but with a more rounded bottom... After that I took the lighter blue and traced a small amount of polish around the bottom of the dark blue shape. I took a toothpick and dragged the light blue out onto the gold in a half-assed feather effect. Just little lines.

And the final result:

It just wouldn't be me if I wasn't too lazy to clean up my the edges <3
-H.Cat

Friday, March 30, 2012

Eye: Sketch

This is, and has been, my go-to eye when I want to look fierce for the past couple months. Dark Diversion Fluidline was limited edition, I believe, but if you can get your hands on it grab it up! It's slightly less opaque than I'd hoped, but still very close to perfect. It's an amazing colour for just about any eye colour, and it really plays well with red hair. This is a shimmery look, so if that's not your thing, I apologize.


I prep my eye with Urban Decay's Primer Potion (Original)


I apply MAC Blanc Type shadow with a big fluffy brush (MAC 227). I apply this all over, from lashline to brow, with a lighter hand going upward. This is a matte2 formula that goes on like butter, blends amazingly well. It's described as a creamy beige on the website. I would call it more of a dirty creamy off white with a pinkish tinge. It's similar to Yogurt, but about a million times better. I use it for a base most days.   


I  pat on Dazzlelight shadow with a shorter stiffer eyeshadow brush (MAC 239) onto my eyelid and a little above the crease for blending later. (You can apply this to your waterline as well if you want a more subtle highlight than the one I'd about to recommend)


I use my MAC 219 pencil brush to apply Sketch (my current muse, described as burgundy with a red shimmer... I find it has a hint of plumb) by touching it to the shadow and tapping, then starting from the outer corner of my crease I use a light feathering motion working inward about half way. I blend this with a windshield wiper motion using my MAC 219 blending brush. Then I smooth that out with a circular motion. If you want a cut crease look you can pick up more sketch with a small angle brush like the 266 and define the crease, lightly "windshield wipe." Etc. 


I dip my other small angled brush (MAC 266) into Dark Diversion Fluidline, which is basically Sketch reincarnate as a Fluidline. I adore it! Anyway, I trace my lash line with that. Most of the time I flick the ends up into a cat eye. If you want to take Sketch and trace over Dark Diversion that will give it more staying power. You can trace your lower lashline with either Sketch or Dark Diversion, or nothing at all. I used Sketch applied from the outer corner, going about 2/3rd in and let it taper off and blend into my waterline highlight.


My go-to highlighter is Nylon. It's very frosty... like my soul haha. I like a strong brow bone and waterline highlight. I apply that with either the fluffy angled MAC 275, small angled 266, or 212... which is like the 266, but... well, not angled. 


Slick on some mascara (I used MAC False Lashes Extreme Black) and you're good to go! I create variations of this look by replacing Dazzlelight with either Vex (a really interesting silvery/pinky/sometimes greenish duochrome) or Retrospeck (a gritty soft gold).


Voila!


Retrospeck


Vex

Nails, Nails, Nails!

I'll start this entry off with a picture of my Clovermeleon! Chloë is almost 5 months old.<3

I've been sidetracked. Every time I have a child I lose a talent. I like to think I'm transferring it down to them, but we'll see! With Rhett I lost my ability to draw. With Cailum I lost my culinary skills. With Chloë I seem to have lost my ability to apply makeup. Maybe I just need to make time for these former talents. 


In any case- I had a bad makeup consultation and it threw me off. My application was good, I think. It was my inability to pick up cues from the client. They were all there, but I didn't take the hint and I applied a classic pinup face on a client who is afraid of makeup. The terror in her eyes! I've never failed to please and it's not something I want to feel again. 


While I've been building up the nerve to get back on the proverbial horse, I've discovered a new passion. Nails! I'm a bit sloppy and I don't have all of the tools and colours I'd love... but that is quickly changing. I've ordered nail brushes and dotting tools galore from eBay, I'm practicing like crazy on everyone I can get my hands on. Without further ado, I present to you some of my musings:
Misc.

Watermelon

Bride of Frankenstein

Water marbling

Scale

Argyle 

Purple Leopard

Corset

Two Tone

Gradient

Next I want to try Peacock. I've actually got a super long list of things to try. Good thing I've got 10 fingers and 10 toes! I will also be working on perfecting these designs and creating tutorials for this blog. As you can see, I haven't been bothered to clean up my manicure before photographing, but you get the idea. 

I've also been painting Chloë's nails. Her last manicure was a glossy black nail with silver tips. It was ferocious! I am loving having a daughter so sooo much! <3

If you're looking for brands to try, I highly recommend Sally Hansen's Xtreme Wear. The colour selection is stellar, the quality is good, and the price can't be beat. They can be found just about anywhere (Shoppers Drugmart, Walmart, Zellers, etc.) I use those and O.P.I. I am hoping to get my hands on some China Glaze, Essie, and Zoya in the near future. I will also be experimenting with artists acrylic paints. There is a brand called Kiss that offers 3 packs of nail paint with stencils for $16 CAD. These paints are AWESOME. I will write up a review soon!


I'm concluding with this adorable picture of Chloë enjoying the unseasonal sunshine :D Isn't she darling!?

Friday, December 23, 2011

Overdue Update: Now Introducing... Chloë!

After more than a year of bloglessness, I am pleased to predict a comeback. I am working on fixing one or all of my 3 computers. In the meantime I have been busy with the boys... and their gorgeous new sister! Chloë was born November 8th, 2011. I have been so tied up with little baby kisses and making tutus. Here are some of my masterpieces:


Thursday, July 8, 2010

Review: Argan Oil; 2 Brands Compared. +Moving!!

For those of you interested in trying Argan Oil, which is all the rave in hair right now (google it,) Moroccan Oil is not your only option- though it probably is the best. It's quite expensive so I haven't had a chance to try it yet. What I have tried are two knock off brands.

Live Clean's Exotic Nectar Argan Oil Treatment (Walmart) ~vs~ One N' Only's Argan Oil (Sally Beauty Supply)

There's a clean winner here, folks. Live Clean's product is by far the worst crap I've ever put in my hair. I am seriously considering contacting them to complain. Don't get me wrong, the Exotic Nectar Argan Oil Shampoo and Conditioner are ffffabulous. So why is this oil so awful? Ughhh. Why *isn't* it? It feels like glue. It will seriously stick your fingers together and when you separate them there will be adhesive, gooey strings connecting them. It's clumpy and doesn't spread evenly throughout the hair, and of course very sticky! In addition to that it seems to cloud over any shine the hair may have, making it incredibly dull. It reminded me of how I imagine a dead person's hair to be. The only leg this crap has to stand on is the smell. It has a pleasant smell, kind of like My Little Pony's used to smell... and even so there is a familiar and strange undertone to the smell that isn't offensive but unsettling. I can't put my finger on what it reminds me of.

Oddly enough, the thing that I wish I could change about One N' Only's product is the smell. It's not bad- don't get me wrong. It's just very earthy, and I'm not into those scents. It does die down a lot after application, and Chad does like the smell of it. I just think Live Clean's oil has the better scent. However, this product actually works! It makes my hair nice and shiny, soft. My hair looks healthier and is stronger. Every so often when brushing my hair I'll pull a couple strands from the brush and see how easy they are to break. There is a profound difference in just two months. Actually, I've got really bad, coarse, frizzy hair that I usually insist on blow drying to keep it smooth. To avoid heat styling (also a reason my hair is becoming stronger, no doubt) I apply this to my damp hair and let it air dry. It is of course curly once dried, but not the crazy curly ball of frizz it is without this oil. This was actually recommended to be by an acquaintance on facebook and I gotta say, I love it!!

And An Update... 

After months of searching for the perfect apartment, I did find one that sparked my interest. Unfortunately it became unavailable about a day or two later. But! There was another available in the same building. Very similar except the living room and bedrooms were a little tiny bit smaller, and the linen closest was outside of the bathroom rather than in. And you know what? The bathroom is bigger!! It almost has a "his and hers" setup. Toilet, bath/shower, two sinks, a vanity type area with lots of drawers and a counter with a sink and a mirror on each end. "Extended bathroom" is what they called it. It has a view of the pool and playground from the large balcony, and the building also has basketball and tennis courts. All of which looked spotless! Lots of trees just outside our window, which is high up. Awesome! Building has been and continues to be completely renovated. Our apartment has brand new paint, carpet, and plumbing. It also has a great location with lots of food, shopping, banks, etc.

So what does all of this mean? I will tell you! My own computer is quite dead, and I've been using my mom's. Following the move I will have no computer access until I get around to buying another one. Looking for a laptop with wifi, FYI! The blog will slow down for a while, but it will not stop. In fact, after moving I will have access to a lot more products to review and possible networking to pick up more tips and tricks. Hopefully not more to rant about!

-H. Cat

PS: Forgot to mention that the price point on both products is somewhere between $11 and 14 CAD. I believe the LC was $11.00 and the ONO was $14.

Saturday, July 3, 2010

Tutorial: Depotting MAC Shadows

Depotting is a great option for those who are tired of pawing through their shadows trying to find a certain colour. It's also great if you're a freak for organizing, like I am. Or even for traveling- a 15 palette on vacation, a quad for your purse. Whatever! Another cool thing is that most (not all) MAC counters and stores will take the depotted shells back, and when you bring 6 in at once you will receive a free lipstick of your choice (excluding Viva Glam) from a MAC counter, or at a MAC store you may choose from a lipstick, lipglass, or eyeshadow.

Worried about getting your colours mixed up? Too lazy to print labels? That's fine. You can heat up the labels on the bottom of your shadow and re-stick them. If they look dirty or faded a baby wipe should make them legible again.

You can pick up a MAC 15 palette for about $16 CAD, and a quad for roughly $5. I had to go to an actual MAC store and not a counter, but the counters will have quads available soon enough. It is time consuming but not very difficult. I do remind you to be careful! You will have several opportunities to jab or burn yourself.

Below is a method you can use to depot your shadows with a straightening iron, instead of flame.

You will need:
  • Straightening iron (any kind, as long as it's flat and you can fit a pan or two on it)
  • Knife (I used a small steak knife)
  • Strip of aluminum foil (to keep melting plastic off of your straight iron)
  • Towel (optional, for sitting hot, stick pans and knife on)
  • Tweezers (optional, for lifting the pan out)
  • Qtips/Cotton pads & Alcohol (to remove glue from metal pan)
  • Magnet (optional, to keep them in place, but I left mine sticky and skipped this for now)
I'm a perfectionist, so I sat down and wrote a list of my colours, then organized them in the order I wanted my palette. My 15 pallet is a spectrum from purple to blue, to teal, to green, to gold, to amber, golden reddy brown, to a reddish copper. See what I mean about this perfection business? My quad consisted of staple neutrals. Crystal Avalanche (shimmery white), Shroom (a muted golden beige highlight colour), Satin Taupe (a taupe brown with silvery bronze shimmer) and Carbon (a matte black.)

I put my straight iron on the hottest setting and went about the first step, which is popping the plastic pan out of the case.

STEP 1: Above, you will see that I have circled an indented area above the little sticky-outty part (technical term, right there!) You'll want to grip the shadow with your index finger on one side and your thumb on the other. Hold it down against a flat steady surface that won't be a big deal if you happen to slip and stab into. Angle the knife down and inwards into that edge. I had better luck trying the corners. Every little eyeshadow seemed to come apart differently. Some easier than others. Just press the tip of the knife in and jiggle it a bit. If you're not getting results, try another area. Be careful not to damage the eyeshadow.  

STEP 2: Once the pan is out, lay a strip of aluminum foil over the bed of your straightening iron and sit the eyeshadow pan and the empty case (label down) on top of the foil. Your label will be done before the eyeshadow. Check after a minute or two. Try to slide the tip of a small knife under the label. It should just lift up and come right off. I swiped the knife completely under it to separate it. That way it didn't curl like it may have if I had grabbed hold of one end and peeled it off. I immediately put the sticker inside the lid of my 15 palette, and on the back of my quad. I put another pan of shadow on beside the first one while I waited for the first to be done. I took it off of the iron and checked to see if the bottom had become slightly melted or warped. I pressed my knife against the bottom and wiggled it up under the shadow fairly easily. If it requires force you need to heat it up more, or you risk breaking your shadow. 

STEP 3: I lifted the metal pan out of the plastic casing on the end of my knife and "wiped" it off on to the towel. You could lift yours out with tweezers. It's very hot and I did burn my finger tips once or twice. I tried to remove some of the glue from the bottom with rubbing alcohol. Some came off in such a way that the glue peeled off in solid... Some were much messier. I wasn't successful at removing all of the stickiness on most of them, but I doubt I'll be playing musical pallets with a lot of them anyway. 

Rinse, repeat, collect your free makeup. You know the drill! Can't wait to go back to MAC and collect my 3 free shadows tomorrow! 

-H. Cat

Updated: Picked up my 3 freebies. I chose Electra, Parfait Amour, and Swish. Here are my palettes thus far. Excuse the crappy cell phone camera.