Showing posts with label Urban Decay. Show all posts

Saturday, April 7, 2012

FOTD & NOTD: Purple Crazy & Family Pictures!

Today I was feeling a little purple-crazy. I did an eye showcasing my absolute favorite shadow in the world. MUFE's Purple 92. Gorgeous purple, richly pigmented, so easy to work with. I accompanied this super bold eye with a purple leopard print nail. Well, sort of purple. It was a pinky purple base with a red micro-pearl, dotted with a purpley blue with a red micro-pearl. I used Seche Base, and ORLY "Won't Chip" so I'll let you know how well they wear in a few days.

The kids and I went egg hunting at Citi Plaza. Rhett was not in the best shape after this outing. Sometimes he can handle crowds, sometimes he cannot. Today was the latter. After that we came home and had an egg hunt in the backyard with the boys' friend Conner.

To recreate this eye, you'll need:

  • Urban Decay Primer Potion
  • MAC Blanc Type (base)
  • MAC Crystal (lid wash)
  • MAC Vellum (inner half of lid, and to blend 93 up towards brow bone)
  • Make Up For Ever shade "92" (outer 3rd, use w/angle brush to cut inner crease)
  • MAC Sketch (use with angle brush to cut outer crease)
  • MAC Nylon (to highlight brow bone & tear duct)
  • MAC Fluidline in "Dark Diversion" (to line lash line, Sketch would substitute)
  • Urban Decay 24/7 Glide liner in "Baked" (a golden shade, to line water line)
  • MAC Feline eyeliner, to (line inner 3rd of water line)
  • MAC False Lashes Extreme Black
  • MAC Embark to fill in my brows
For the lip I used:

  • Wet 'n Wild liner in shade 666, "Brandywine"
  • Rimmel London lipstick in "Asia"
  • MAC gloss in "Oversexed"
And on my face:
  • Revlon PhotoReady Airbrush makeup in "Vanilla"
  • Sally Hansen Inspired by Carmindy blush creme in "Ginger"
  • Tarte "Smooth Operator" translucent finishing powder
 So without further rambling, I present you... More pictures of makeup, nails, kids.


Chloe looking fierce on her way to Citi Plaza

Rhett anxiously waiting for the bus

Cailum waiting patiently 

Cailum at our own egg hunt after the one at Citi Plaza

I thought he was trying to play ball, but the Easter Bunny had placed an egg on top of the ball :D

"I found it!"

Rhett's made a discovery!

Some brotherly competition.

Rounding up the troops.

Something along the garden...

"Yaaay!"


That's all, folks <3
-H. Cat

Friday, April 6, 2012

FOTD & A New Spotlight (WCW)


Hello!
I'm trying to keep this short and sweet (like I would even know how! I am the queen of over-share) because my back is injured, yet again! Just as it was almost better, I am completely cripples with pain and I want to vomit. I still took the time to scribble on some makeup for my FOTD though! :D Plus there was the chance that I'd be going to the hospital, and I've already neglected my hair and tweezing. I didn't want to be mistaken for some sort of mythical beast. Oh, look... I'm rambling. So much for short and sweet.

Anyway, below my FOTD will be my new spotlight. It's called "What Fierce Outfit is Chloë Wearing Today?" or... "WFOICWT" Hahah.. Okay. That's a bit much. Maybe "What's Chloe Wearing?" tagged as "WCW." I'll work on it.

OKAY, BAM!!!

For the eye, I used:

  • UDPP (primer)
  • MAC Woodwinked (lid)
  • MAC Stars n'Rockets (crease, lower outer corner of lashline)
  • MAC Dazzlelight (highlight)
  • MAC Nylon (inner waterline)
  • MAC Embark (upper lashline)
  • Urban Decay "Baked" liner (across waterline)
  • MAC Stubborn Brown pencil (outer 3rd of waterline)
  • MAC False Lashes Extreme Black
The lip is:
  • Wet 'n Wild liner in 666
  • MAC St. Germain lipstick
  • MAC Oyster Girl gloss
And on my face:
  • Revlon PhotoReady Airbrush makeup
  • MAC mineralize blush in "Daft Pink"
I skipped a lot of priming/base steps and rushed through my application. You can look at any of my other FOTD's to figure out how this was applied,which brushes etc. It's my standard go-to application. 

Tried to get a variety of lighting. It was hard to get these colours to show properly, but I eventually got it. 


And now...
Drumroll...

What's Chloë Wearing??

I'll tell you! Chloe is wearing: 
  • Tattoo inspired onesie from London Rock
  • Leopard hoodie & Jeggings from Walmart
  • Pink fancy jeweled shoes courtesy of her friend Dallas (and his parents Erin & Mike)


Now I just need to make a fancy header for these spotlights with a picture of Chloe looking like the fierce diva she is. Ciao daahhlings! <3
-H.Cat

Tuesday, April 3, 2012

FOTD

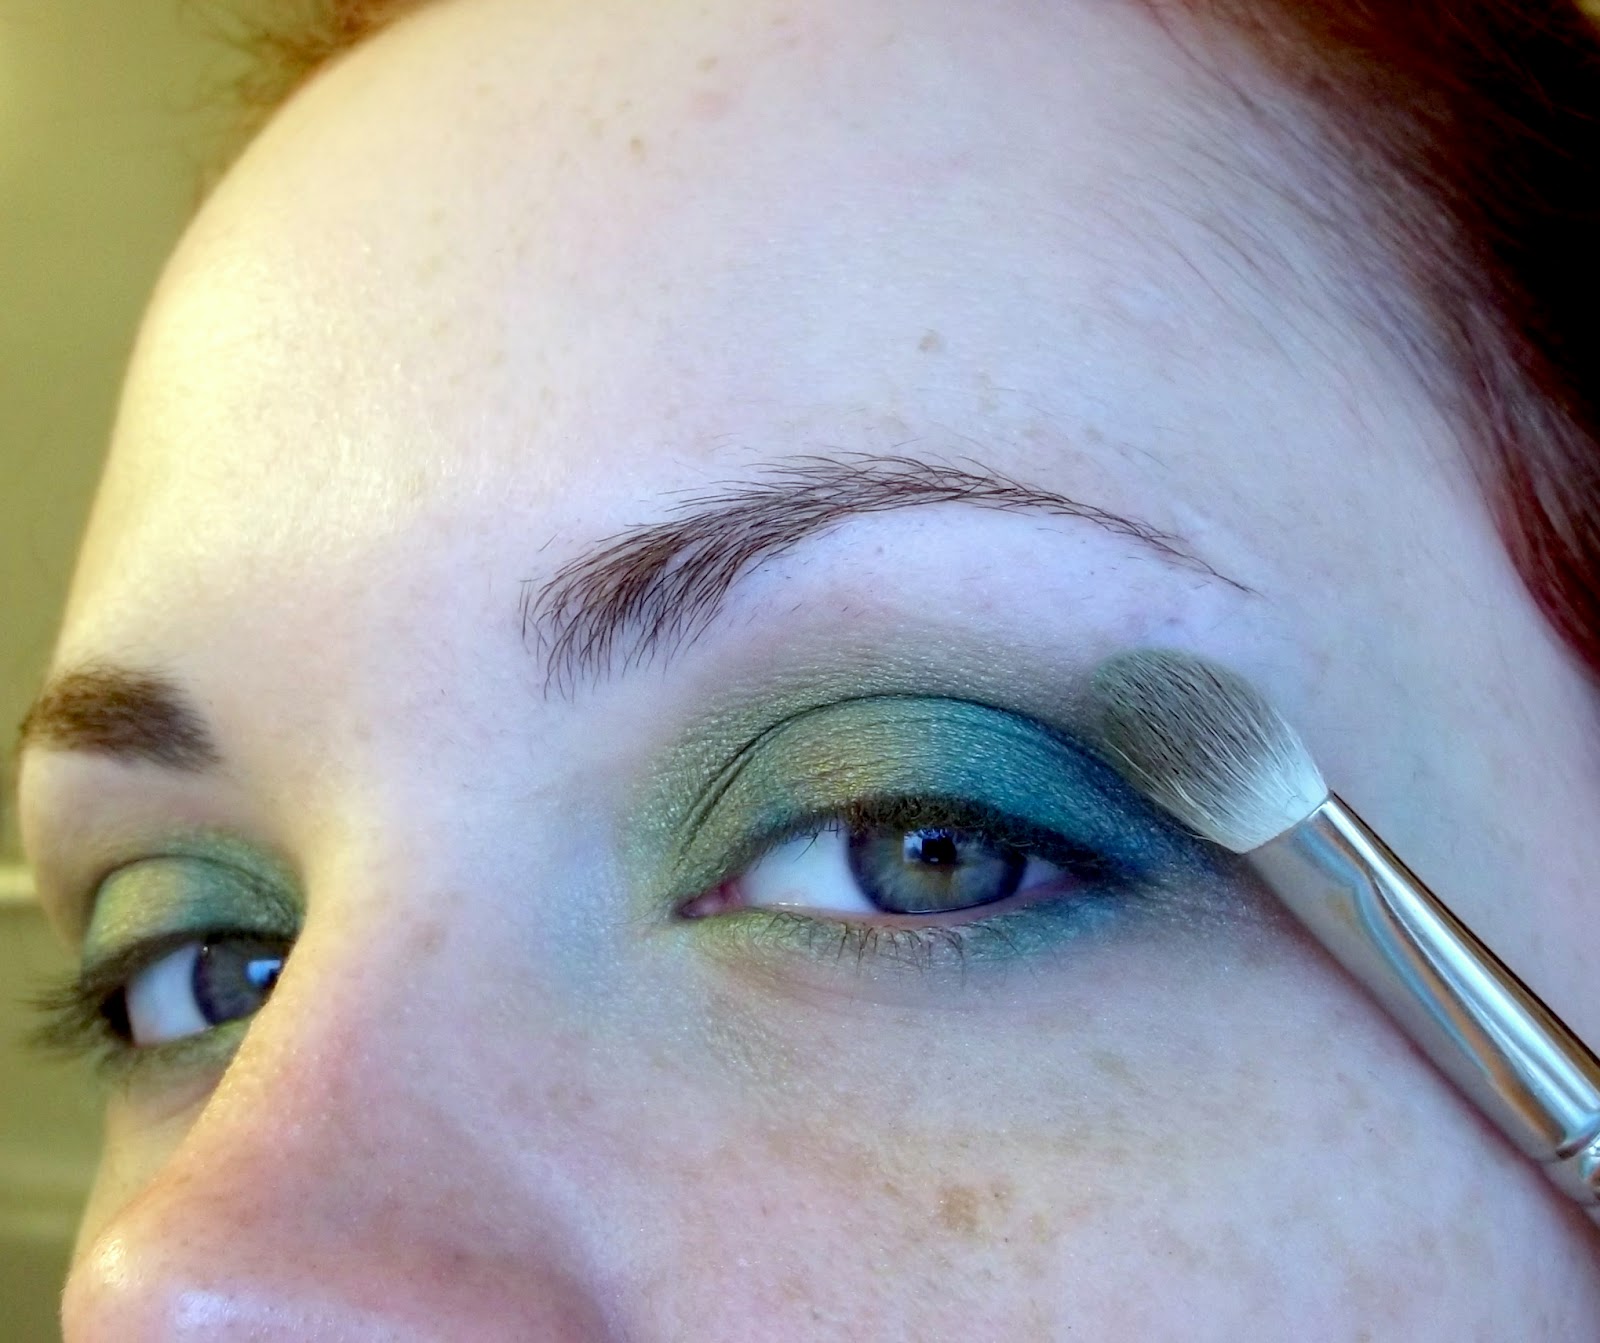
This was my Face of the Day. It's more of an Eye of the Day. The colours, particularly the green, absolutely refused to photograph properly! It was MAC's Bitter, so a really intense bright limey almost yellow green. I have every intention of editing this later, as it's rushed and poorly written.
I used:
  • Tarte ReCreate primer
  • Benefit Lemon Aid
  • Urban Decay Primer Potion
  • MAC Blanc Type
  • MAC Too Dolly (LE) (*or MAC Aquadisiac)
  • MAC Bitter
  • MAC Deep Truth
  • Urban Decay Dashiki (*MAC Freshwater works well, too)
  • MAC Nylon
  • Gosh eyeliner
  • Urban Decay 24/7 pencil in Electric
  • MAC Feline eyeliner
  • Stila Stay All Day Waterproof Liquid Liner
  • MAC False Lashes Extreme Black
  • MAC Embark
  • Revlon PhotoReady Airbrush in "Vanilla"
  •  Physician's Formula Peach-to-Glow
  • L'Oreal HIP gloss in "480 - Snazzy"
  • Tarte Smooth Operator powder
Annnd this is how you can create it for yourself. You can use dupes of any of these products. For simplicity's sake, I'll just state what I used:
  • After moisturizing, apply Tarte ReCreate primer to your face
  • Apply UDPP to your eyelids and lower lash line
  • Apply concealer if needed (I applied Benefits Lemon Aid to my under eye, and red areas)
  • Use a big fluffy brush to apply MAC Blanc Type from your lash line up to your brows
  • With a short, stiff shading brush pack on MAC Too Dolly (L.E. from the Hello Kitty, Winter '08/'09, Too Dolly quad) onto your eyelids. You could use MAC Aquadisiac (teal blue)- I don't have it but I would have preferred it for this look.
  • Load Bitter (a super bright snotty green) onto your pencil brush (MAC 219) and tap off the excess. Apply this to your crease. First with a stippling motion, then work in with a windshield wiper motion. You want this to peak just above the crease. 
  • Next, you'll apply Nylon (a frosted pale gold) to the brow bone area with a big fluffy brush, using it to blend the Bitter up, and blend the edges away. You won't so much be blending the Too Dolly and Bitter together. You want those colours to be defined. 
  • Use an angle brush (my MAC 266) or an eyeliner brush to apply Dashiki (a medium sky blue with a hint of teal) from the inside corner of the upper lashline out. You want to keep this close to the lashes, but not so tight that the black liner will cover it
  • Then you'll pick up Deep Truth with the same brush and apply it from the outer corner of the upper lash line, about half way in, blending it into Dashiki in the middle
  • Tightline with your liquid liner (I used Stila Stay All Day)
  • Take Gosh Let's Twist eyeliner (a bright snotty green, equivalent to Bitter) and apply it it generously (so that when you apply your black it will peek through,) from the inside corner of your waterline, half way across
  • and Urban Decay in Electric on the outside, slightly blending them in the middle with an angle or liner brush, exactly as we did with Dashiki and Deep Truth 
  • Apply MAC Feline (a creamy super black eyeliner) working from the outer corner, tapering half way in
  • Slick on a coat or two of  mascara (MAC False Lashes Extreme Black)
  • Using a big fluffy brush (MAC 187), apply Peach-to-Glow to the apples of your cheeks
  • I swept on some L'Oreal HIP in "Snazzy", using the peach side(it's a duo, and they're really pigmented and have a great sheen. These are actually really good!)
  • Set it with powder and a powder brush (I used Tarte Smooth Operator and MAC 187)
  • Fill in brows with an angle brush and MAC Embark, or whatever colour suits your brows (which I did way earlier and forgot to mention. I do brows first. It makes an excellent frame for the rest of your makeup) 


Andddd this link is to the portrait photography page of an amazing local photographer, Dana Brushette. Click "like" on her page to keep up to date on what she's up to. She's always doing cool contests. I entered my son Cailum in her Children's Contest (the Untitled Album) and voting is open until April 21st. We'd love if you would shoot him a vote and help him place somewhere. Dana actually does a lot of cool pinup work that I think you, dear readers, would appreciate. So check it out! Thanks! <3

-H. Cat

Sunday, April 1, 2012

Eye: Peacock

I thought I would do a peacock inspired eye to go with my recent Peacock Nail Tutorial. I haven't done a peacock eye since MAC came out with Peacocky in Winter 2010. The one I did back then was a green and purple, so I thought I'd change it up. This look was a half success. The problem was a combination of things. That I'm feeling lazy, that my brushes were dirty so I couldn't get good colour definition, that I started without a clear idea of what I wanted to do (and overworked my poor sore eye), and also that there were waaay too many colours I wanted to cram in here. I have so many perfect colours!
Anyway, enough buildup! The bottom line is that this is what I did, the colours and brushes I used, and hopefully I inspire someone to try their own.
(Also note my skin in these pictures, in the finished shots. This is the Revlon Photoready Airbrush stuff... Wow! I will review this soon. And finally, excuse my budding unibrow :D)

What I used:

Note that the number has nothing to do with application order... or anything other than to indicate which colour I used)
These are all MAC shadows.
1. Amber Lights
2. Humid
3. Blue Candy (LE)
4. Juxt
5. Freshwater
6. Deep Truth

I have a Lise Watier glitter in the photo that I did not end up using. There is my HG Urban Decay Primer Potion up in the right corner, and from left to right we have MAC False Lashes Extreme Black, Urban Decay 24/7 Pencils in Electric & Baked, MAC pencil in Undercurrent, and Stila Stay All Day Waterproof Liquid Liner.
The 219 that is hiding is a pencil brush. From top to bottom, you'll see me refer to these as  my flat brush, shading brush, blending brush, angled brush, pencil brush, and fluffy brush. 


 I applied Juxt lightly all over my eyelid up to my brow with my big fluffy brush, then I patted it on my lid with my shading brush.


I always wiped my brushes after switching colours, but you should probably use different brushes if possible. I was just being lazy. Here I'm applying Amber Lights to the center of my eyelid in a patting motion using my shading brush.


I used my shading brush and Blue Candy (LE) to apply slightly rounded line of colour. You want this colour to "hug" your eyeball. (sounds gross, right?) 


Then you're going to do the same to the other side of your eyeball, curving outward. Like so... 
After that, you'll be building your colour towards the outer corner of your eye. I applied some Lucky green right beside the Blue Candy, and then some Freshwater. It started to look a bit muddy... too many colours on one dirty brush, but I go back in to define the colours in a minute.

I dipped my pencil brush into Amber Lights and patted over the original section. Then I did the same with Lucky Green, Blue Candy, Freshwater... I went from lightest to darkest just so I wasn't buggering up the brush. I could have avoided this all with better planning, but this is how it all went down! Haha. 


I grabbed my blending brush and very lightly worked from the inside corner to the outside with little outward sweeps. You want to blend it, but not too much. The colour individual should definitely stand out. 

From here I cleaned up the fallout with a Q-Tip and some moisturizer. I took my pencil Brush and applied Deep Truth to the outer 1/3rd of my crease and blended it in a windshield wiper motion with my blending brush, then took my fluffy brush and lightly swept some Juxt overlapping my crease colour and a bit up towards the brow. I blended that very well with little circular motions. I applied my eyeliner, and I used Humid to blend outer corners of my eyeliner up into the Deep Truth applied to my crease. 

A few of my pictures didn't turn out, which is why I don't have pictures of the final few steps, but I used the 3 liners along my lower lash line, just slightly below the waterline (that way when I applied my black liner it wouldn't completely cover them.) I used Baked (the golden colour) in the inner corner, Electric (the bright blue) in the middle, and Undercurrent in the outer corner.I used an angled brush blend the end of one into the start of the next, and flicked the end of Undercurrent up into the winged eyeliner. By now my eyes were so sore from being overworked (it was a trial and error thing) that my eyeliner did not want to stay in place. 

I applied Feline to my waterline, which is a dark black MAC liner. I set it with a fluffy duo fiber brush (MAC 187) and Tarte setting powder. I applied one coat of MAC False Lashes Extreme Black mascara. Somewhere in between I penciled on my brows and applied Revlon Photoready Airbrush makeup with a 187 and a cosmetic sponge. Here is the finished product:


 It's kind of a mess of a tutorial, but it's been a mess of a process! <3
-H. Cat

Wednesday, June 30, 2010

Review: Urban Decay Eyeshadow Primer Potion & Liquid Liner

Urban Decay Eyeshadow Primer Potion

I wish I had something interesting and original to say about UDPP, but it's all been said before. This is the HG (Holy Grail) product of makeup artists, magazine editors, and aficionados alike.
The silicone based formula transforms your eyelids into a silky smooth canvas ready to grab and intensify colours and keep them on lock-down all day long. In the long run you will be using less of your favorite eyeshadows because it takes significantly less to get a great colour pay off. You will want to be careful with your already richly pigmented colours. 
I did a mermaidesque look using MAC's Bitter, Freshwater, and Humid about a week ago. Before UDPP I'd have to fight bitterly (teehee) to get any colour pay off from Bitter whatsoever. I was thinking of swapping it... until I tried it over top of UDPP. It looked as vibrant as it does in the pan. Freshwater and Humid already have a strong colour payoff, and I didn't know enough to use them VERY sparingly over top of UDPP so it made for a rather bold but striking eye. Wish I had pictures. Still working on the camera.

To apply this I start with a clean moisturized face. I scrape the brush on the edge of the jar on the way out so there's not so much product. I do a swipe across each eyelid, then another swipe just under each brow and blend. If you're going to apply shadow to the lower lash line I would trace that as well. I pat it in with my fingers and smooth it over. I go on to the foundation of the rest of my face while allowing UDPP to dry. I personally do not apply foundation over it, or under it. I suspect that might aide in creasing, as I believe it is meant to prime for powder and not creamier layers. So if you're using this and experiencing creasing that may be the problem. Or perhaps you are using too much.

I've tried MAC Shadesticks, Paints, Paint Pots, The Body Shop's primer, and Benefit's Lemon Aid. Urban Decay Primer Potion is the one I love best. Lemon Aid is absolutely awesome for dark under eyes, but just so-so as a primer. My runner up would be MAC Paints in matte shades. The shimmery ones tend to crease.   

 PS: Due to the cute but impractical style of the packaging, you'll want to google a tutorial, perhaps a youtube video, on how to depot this stuff when the well appears to have run dry. There's tons of excess in the bottle. You just need to take it apart.


Urban Decay Liquid Liner in "Perversion" (Black)

After swatching every black liquid liner in Sephora I decided to adopt this one. In case you were wondering, my finalists were Lancôme's Artliner, Tarte's Indelible Wink, and Urban Decay's Liquid Liner. In that order.

I initially felt that Artliner was a bit inky and was put off by it, but it did dry quickly, was a nice rich black, and lasted on my hand until the end of the day. I believe it had the highest price point, at about $40 CAD. I did see on an interview that this is what pinup sensation and MUA, Dayna Delux, uses- which is what happened to bring me into Sephora that day.

Tarte had the blackest black and it seemed to hold hold up the best, too. It had the middle price point, which was... $30 something. Sorry, I can't quite remember. The off-putting factor was that the packaging looked and felt cheap (to me, anyway) and I've had absolutely no experience with the brand. Might be worth checking out!

So that leaves me with my Perversion, the name of UD's black liner. This had the lowest price point at about $20 and judging by the packaging it's a lot of bang for your buck. Hopefully it won't need to be depotted, like the Primer Potion.

This is pretty much a little ink well with a teeny tiny brush, seen to the right. I do not like that the hole is significantly larger than the applicator wand. It's kind of messy when trying to wipe the excess on the edge, and is probably spillable.

The formula is very black and has a bit of a nice sheen. It glides on and dries quickly, but not so quick that you have to time to work with it. The applicator (even though I generally use MAC's 266 angle brush) is capable of creating those perfect, bold yet skinny straight lines. It's actually a decent applicator, even though I'd normally prefer a felt tip.

I love both products reviewed and would definitely recommend. Urban Decay knows what they are doing!

-H.Cat